We're Vikings: The Terrors of the Sea!


It's admittedly quite a change up.  A few weeks back we were pretending to be monks, living quiet, humble lives in our stone monasteries, doing penance on our knees and tasting pottage and mead.  And today, we're learning about Vikings, a bloodthirsty group who'd slaughter a monk and make off with his pottage.

After we read up on Vikings and their many journeys across the Atlantic, exploring Iceland and Greenland and North America, we decided it would be fun to create a Viking helmet and shield.


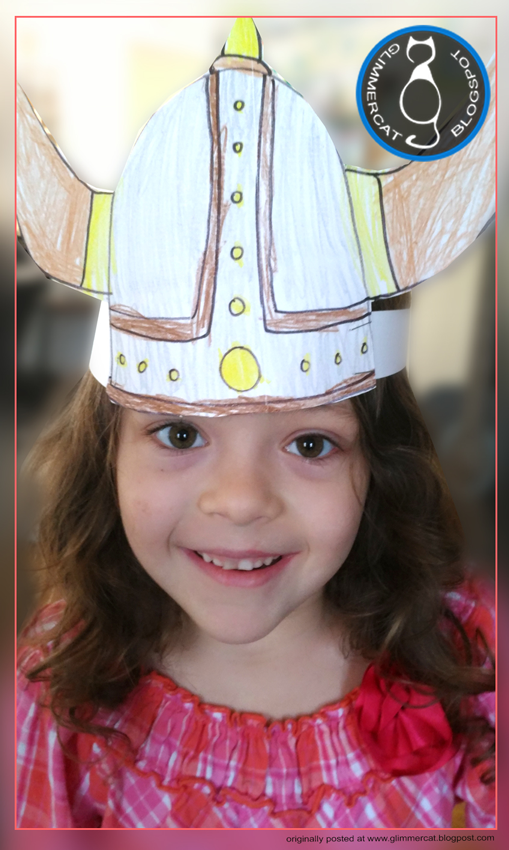
Although I created a color version and a black and white option, the kids wanted to color their own.  And maybe add a few extra designs to make the helmet truly their own.


A bit of color, a few fine jewels drawn on:  we're definitely getting the hang of what Vikings valued back in their time period.  That, and land.  They did appreciate a good piece of land, didn't they?


After we completed our helmets, we were ready for more!  The shields were brought out!  Now I admit, I did not intend these shields to be used in pretend play.  The idea was to let the kids design their very own shield:  with colors or images that made it uniquely theirs.


 We were printing on card-stock (I always print these kinds of things on a good thick sturdy card-stock!) and rather naturally, the kids cut out their shield once they'd colored it, stapled on a hand grip and were deep in Viking combat almost before I knew what had happened!


Those paper swords were kid created, out of a rolled up and stapled card-stock sheet.  These shields aren't sized accurately.  Let your kids know, if you try out this activity, that actual Viking shields were at least 32" in diameter, and the boss in the center, was like a 6" dome off the front!


The next day, these kids were still hot to trot about Vikings.  So, we investigated a bit more and came up with these fun activities!

First of all, runes!  There are several different Viking alphabets because they were always adding more as they conquered new peoples and added that to their language, too.  The alphabet we share in our Viking Activity packet has 21 characters.  As we looked over the characters, we could see several that are in our own English alphabet today (with a bit more curvature).  We also watched this excellent introduction to Viking runes:


After that, the kids were ready to try out carving runes of their own.  We made our own dough (using flour, cornstarch, coffee and one drop of blue food coloring) and we drew our runes using plastic knives.  This was easier to do than I first thought it would be.  The Vikings knew what they were doing with that upright line based alphabet!


And last but not least, we decided to create a paper model of a Viking longboat.  This, along with all the activity pages in this post, is available in our Store.  You can print out a fully colored version or and black and white one for coloring in yourself (my kids always prefer that!).


Now the cutting was a bit tricky for my 5 year old, admittedly.  She needed a lot of help.  But once I explained that all the dotted lines were for folding, she went after those folds.  Great folding practice!


We used glue, staples and tape for attaching things.  Staples were best for the mast, and glue was best for affixing little tabs together.  But the finished product looks neat and was fun for pretend play while I read out loud a bit more about those villainous Vikings!


And we finished up our Viking study by putting on "How To Train Your Dragon" just for fun.  It's always important to clarify what is fact and what is fiction in these stories but you just can't go wrong by hanging out with Hiccup.

All of the activities previewed here are available in our store for purchase.


Thanks for reading, and please share your favorite Viking activity in the comments! 

Making Quill Pens and "Parchment"


We're having so much fun with our medieval studies over here, that we decided to delve a bit more into the tasks of the early Christian monks.  We read how the monks made their parchment papers (which was actually quite an involved process utilizing animal skins) and sewed their pages together...so we decided to attempt something like this.

Not having any fresh animal skins to work with, we decided to "fake" the parchment and just make it look like parchment.  This is a pretty easy process, where you begin with a peerless piece of modern white paper (that a monk would have honestly killed for), and demolish and otherwise destroy it with coffee and crumpling so that it looks a bit more like the stuff they had to use.

But we'll walk you through it here.  Start by tearing off those pristine edges:


Then crumple it up as small as possible in your fist, flatten it out on a cookie sheet, and smear left-over coffee all over it.


After the paper is nice and soggy, spread it out somewhere to dry, either naturally in the sunshine, in the oven for a minute at 350 degrees, or even with a blow-dryer.

That's how you make "parchment" (in quotes because it has absolutely nothing to do with the way parchment is actually made, but the finished product does have a nice ancient paper look).  We were so inspired with our skill, that we decided we could make ink in old fashioned ways, too.  And besides, The Hippy Homemaker had this amazing post about the many different ways you could make ink at home.  The kids and I took a nature walk, found pocketfuls of acorns and brought them home to give the acorn ink a try.


After boiling these guys for about 45 minutes and adding water when it steamed off, we finally got a liquid that looked promising.  We added a touch of gelatin to increase its thickness, and got out our dried parchment to give it a try.


Now to be fair, it did leave a faint stain on the parchment.  Very, very faint.  Maybe acorn ink needs about double the boiling time we gave it.  Whatever the case, we gave homemade charcoal ink a try, too.  But it was watery and faint, too.

Actually, trying these inks gave a whole new meaning to this little image showing complaints of monks from a prior age:


We read all of these over after our failed ink attempts and chuckled in understanding as these guys from long ago could definitely be related with, now.

The next day, I went out and bought ink from a craft store.

 
The feathers worked really well, once we trimmed them into nibs.  If you're trying to trim them yourself, you can follow this excellent video which explains how to cut a decent feather quill pen:


But before we could use our Quill pens, we decided we better sew up our parchment pages first.


A nice sharp needle and some sturdy thread made short work of that.  But the kids did observe that they were glad they were only sewing together two pages because any more than that would have been a challenge.  If you use regular paper rather than cardstock you might be able to sew more together at a time.


Now, we have our parchment book.  All ready to pull out the homemade store-bought ink and try it out with our fresh quill pens.


The kids took to these pens remarkably easily, I thought.  They were surprised at how often they were required to dip their pens into the ink in order to complete just one letter, though.


But then it became business as usual, "Dip - Write - Dip - Write".  But the learning moment was expressed out loud by this memorable quote:


And there, you have it:  why we do these crazy things.  I mean, aside from the fact that it is oodles of fun to try out things and experience them for ourselves.  Because you cannot impress something like that on a young mind better than letting them discover it personally.


Maybe, I should pull out our Medieval Illuminations quotes one more time and let the kids try inking those letters in one more time, but with a quill pen...


Nah, let's keep it all fun.

And speaking of fun, don't forget to read about the very fun Medieval Feast we experienced last time.


A Medieval Feast fit for a Monk


We are diving into a second year of classical history.  This year's study will begin with the Fall of Ancient Rome and travel all the way through the Renaissance, the Reformation and up to the beginnings of Colonization.  At the moment, we've been taking a little time with the early Christian monks.

We began by reading our chapter in Story of the World, Volume 2, which tells us of the noble aspirations with which the monasteries were begun.  We took a listen to some Gregorian Chant.


Not all Gregorian Chant is created equal.  It should be made up of just men's voices, and no instruments.  Because that is the point, of course: it's the music you get when a bunch of guys are stuck together with few creative outlets and a pious belief system which said the only channel for pleasing God was by singing for your supper.   "Chant" has a pretty, though melancholy sound, and will give your young listeners an idea of the primitive nature of good music in that era.  You can almost feel the dank, cool halls of stone. 


We even tried walking across the hardwood floors on our knees, like the monks sometimes did when they were serving their penance.  This was the kids' idea, actually.  Because it's fun if you don't have to do it and if you can get up once your knees get sore.   The very serious look is part of the pretend play. 

We also took some time to look at various Medieval Illuminations, that other channel for the monks to let loose their creativity.  And using this latest product from our store, we took some actual quotes from monks and illuminated the copied scripts ourselves.


There are three quote options to choose from in our "Medieval Illuminations" Packet.  On each one, there is room for added illustrations, and coloring in the letters.


First, the kids drew images like they had observed in the Illuminations we looked at in advance: small animals, vines, leaves, and flowers.


And then, they colored them in.  To take it up another notch, we could highlight parts with gold paint, like the monks did.  But this was a pretty good beginning.

But let's get onto the feast, shall we?   Now, I know you're going to ask the question, "What's with the robes and blankets?" 

This was another child-inspired plan.  When they heard that the monks would wear simple brown robes and walk slowly and piously around their monastery, nothing would do but that my kids had to run off and grab blankets and robes that would give them the same monastic look.  I was allowed to snap one photo of them pacing slowly across the living room, but only from the back.


Here it is, for your viewing pleasure.  You can see our cat was thoroughly confused at their slow tread and bowed heads, but the kids were loving this monastic pretend.

But let's talk about this Medieval Feast we enjoyed, shall we?  First, the main course:


You can vary your root vegetables.  You could throw in a turnip or a parsnip, but I would definitely keep the onion for flavor.  This was an easy recipe and borrowed from many recipes online.  As BrandNewVegan explains here, this humble stew was the standard fare for most peasants in the Dark Ages.


Now, about those Honey Cakes, which were the favorite of this meal, I owe the recipe to the free online PDF found on "The Circle of Ceridwen Cookery", which has some other delectable looking middle age recipes I'd love to try out.    


They taste a bit like a rough biscuit, slightly flavored with honey.  I would definitely recommend letting your students flavor them up with a bit of butter and additional honey.

Next, some sides we included which were probably reserved for very special occasions, were the slice of pear and bit of hard cheese.


There are a variety of cheeses you could allow your kids to sample.  Some cheeses you could use are Cheddar (first recorded use is in 1500), Gorgonzola (first recorded use is in 879), or Gouda (first recorded use is in 1697).

Now, about our Mead.  Monks are known for making mead.  This is not their actual recipe in its fermented version, because for obvious reasons, I'm not suggesting alcohol for kids.   This is the un-fermented recipe before it ferments.  But, you can make the actual version, from a 17th century monk recipe right here.  It takes a good 9 months to ferment properly, and to be honest, I don't think I have the patience to wait around for it.  But I'd still personally like to try out real mead,(I have always wondered about it during the reading of almost every slightly historical fantasy book out there) and I found a version that can be purchased here on Amazon.  (It has great reviews!)

In the meantime, you can get the gist of the taste of mead, by brewing up a starter batch of the un-fermented brew:


And that's it, that's our Medieval Feast in a nutshell.  If you have additional medieval recipes you would like to share, please post a link in the comments.  We love to add to the information gathering!  And thanks for reading.

Ideas for Your Morning Calendar in Your Kindergarten Classroom


Morning Calendar is one of the most fun times in the classroom, isn't it?  Especially, when you keep it interactive.  Anytime children get the chance to be a part of the action, they have a blast and the learning skyrockets.

Just because I'm now homeschooling rather than teaching in a traditional classroom, does not mean I want my kids (or me) to miss out on this fun!  But...we have a small space.  Our open kitchen and living room with a built-in computer desk, is our classroom.  I've limited myself to one wall of that area (ONE!) for our educational bulletin board.  So, come into my house, and take a close peek at how we use our wall space, fit in our Morning Calendar, listen to some of our Morning Songs, and take a peek at some freebie links to Morning Calendar follow-up ideas.


Because our area is limited, I have to make strategic decisions about what I find the most necessary items to include for my kids' ages and abilities.  I have one in preschool, one in Kindergarten and one in 2nd grade.  This means one of my first priorities is our Alphabet Cards.


Our Alphabet Cards are colorful, but my favorite thing about them is the way they are designed as if they are on a piece of ground.  Letters resting on ground is a helpful way to show explain to kids how some of lowercase letters go "underground", (or under the mid-line) as they do when they are written.


The pictures also show an image that is helpful in remembering the sound that is displayed.  For instance the "P" here makes a sound like popcorn popping, and our cat character (Glimmercat) is cooking up some popcorn in the shadow of Letter P.


If you're teaching in a classroom setting, a "Morning Song" is a great way to let kids know it is time to gather around for Calendar Time.  YouTube's "Super Simple Songs" has a repertoire of Morning Songs that are great for this use.  Here's an example:


When I taught in the traditional classroom setting, I had a variety of morning songs I pulled from.  Students knew that by the time the song ended, they were expected to be sitting in their places, ready to go.  It was a fabulous way to get their routines started for the day.  


My actual bulletin board is 22" x 34".  That's a SMALL bulletin board.  And the first thing I needed to go up on that bulletin board was our Calendar.  I use our monthly Calendar for teaching patterns and going over our numbers, daily.  Repetition being so helpful for little ones, this is recommended, and teaching them numbers and patterns in conjunction with "Today's date", makes it all very relevant to children.


This Calendar is designed to be interactive for children.  Some of the interactions are daily, and some will move seasonally or monthly.  For instance, my daughter was able to easily turn the arrow that pins into an image of a sun when we rolled over into September.


Likewise, she will only turn the seasonal arrow again when we move into Fall.   This way she will learn that the months and seasons are like a rotating wheel, directed by our own sun.  But let's look closer at the items she gets to interact with daily.


First, she daily changes the days on our "Day of the Week Rainbow".  A VERY fun song to accompany this rainbow to help learn the days, is seen here, posted by KidsTV123:


How perfect is that?

My five year old considers herself quite the pro at both of these already, and she loves the ownership of being able to change them herself.  


I decided to create a great many numbers in varying colors so that I can create my own patterns for her.  In fact, there is no end to patterns I can create and the complexity can increase as we go. 


This set (Numbers and Tags, Set 1) is available in our store.  I've been having quite the Bohemian design spree recently, so after completing this set, I went ahead and designed a second one, because when jumping into Boho styles, you simply can't have enough variety of color and patterns!


So, now I get to show off our other set, (Numbers and Tags, Set 2), which is also up and available.


The last thing I want to share today is another freebie.  After completing the Calendar together, send your students back to their desk with an opportunity to try out their skills on their own:

               You can download this FREE Daily Calendar Journal, right here in our store.

And if you have songs or additional fun Calendar Activities you'd like to share, please do so in the comments!  We love trying out new things!

Introducing History by Staging an Archaeological Dig


Let's get down and dirty, shall we?  In this post, we're sharing how you can stage your own archaeological dig with your students with a little preparation and a patch of dirt.   There is a time investment in this activity, but what better way to introduce history to young people than to give them an experience of how the real folks do it?  All of the activity printouts that you will see here come from our Archaeology Tool Kit which you can purchase for easy download in our teacher store.


In that activity packet, we also offer a lesson plan for staging an Inside Archaeological Dig, just in case you only have a classroom to work with. 

The fun of doing a Dig is that I can almost guarantee that after this hands-on lesson, at least one kid is going to come away from it thinking, "I want to do THAT when I grow up!" 

Also after this experience, any primary sources or artifacts that are observed in your upcoming history lessons will be treated with a bit more awe.  When kids have an understanding of what goes into discovering that artifact, respect naturally follows.

But let's discuss how to Prepare for your Dig.  First, we need some "Artifacts".  There are three types of artifacts we recommend for this activity:  Material Remains (chicken bones will do the trick), Points (arrowheads can be purchased inexpensively online), and Potsherds, or Shards.

Let's start with the Shards.


There are many recipes for homemade pottery out there.  We include our own simple recipe using common household ingredients in our Tool Kit.  But if you want to pick something up for this, you can always grab some clay at a local craft store.  Best results for breaking your pottery will occur if you don't allow it to dry completely. 

Don't worry to much about creating an aged look.  Five minutes buried in your dig will accomplish wonders.


Bury your items in an area that is roughly 3' by 2'.  Mark it off with twine and label the grid with letters corresponding to our Grid Chart above.  Make sure everything is covered up with dirt, but not too deep.  It's a good idea to keep track somewhere yourself, just how many items you buried and what they were. 

If it would make it more fun (it did for us), send your students Glimmercat's letter (seen above) in an envelope, inviting them to take place in an Archaeological Dig and explaining the items they will need to keep an eye out for. 


In order to better prepare, we then watched some real archaeologists in online videos, as they explained how carefully they sifted through their dirt.  This turns out to be important when searching for arrowheads.  

Another important step when doing an outdoor dig, is to prepare for it by wearing clothing that can get dirty and including a good hat and sunscreen.    The clipboard also came in handy.


The tools you will need will vary depending on how solid your dirt-pack is.  Based on the assumption that you prepared your dig right before the lesson, kids might be able to get away with just using their hands.  I suppose they could use gloves, but gloves can be unwieldy.  A shovel is way too big and could damage artifacts.  A trowel might even be too big, though we did have one available. 

A good stiff hair colorist brush is very helpful.  But little hands that aren't afraid to get dirty are the best tool you can use for this activity. 


We wanted to add letters to our Grid to help make the connection between the worksheet on the clipboard and the physical map of the dig.  So we added letters, as you can see here.  We secured our letters (to match our Grid) with thumbtacks.  Small metal tent-stakes would have worked even better. 


The best moment of all when you do this activity is when that first artifact is found.  Ours was a small arrowhead.  The excitement is tangible and all of a sudden, everyone is wide awake and ready to search for more "treasures"!  But first, we must mark down where we found it and what we found:


First on the Location Grid, she marks down the Letter corresponding with the area she discovered her arrowhead.  And next...


She draws a rough picture showing what and where in her area.  Once this is completed, she can head back to the Dig and look for more!


An exciting addendum to this lesson is to allow student to attempt a reparation of their pottery pieces.  If you include pottery in your dig, that is. 

Allowing the students the opportunity to carefully clean and glue the pieces back together will again, give them a new understanding when they see repaired artifacts in a museum or photos of the same online. 

Thank you so much for reading about our Archaeological Dig!  We'd love to hear how you introduce history in YOUR classroom in the comments.